
PIER
Installation
Instructions
Your telescope pier uses an anchor kit with a CNC template and anchor bolts for accurate polar alignment and superior leveling. The base plate has 10 degrees of adjustability but it is best practice to take just a bit of time and set things up correctly rather than rely on the adjustability to fix it later. Follow directions on the right for the most accuracy. Cell phone compasses can be off by 10 degrees either way. Sighting a magnetic compass is also not very accurate in this application.
GEN2 piers are unique but follow this same procedure. For more information, click “GEN2 Solutions” in the top navigation menu.

Establish a north-south string line:
If you can see Polaris:
Set up and level an Alt-Az scope over the pier location. Center Polaris. Use a free phone app such as PS Align to determine how far Polaris is from the pole at that time. Move the scope in azimuth to account for the offset. Don’t worry about the altitude yet. For example, if Polaris is 0.5 degrees west of the pole, move the scope to 0.5 degrees east of Polaris. If your field of view is 2 degrees, you would move Polaris half way to the edge of the field. Leave everything until the light of day and then move the scope down in altitude, leaving azimuth unmoved, until you can see an object you can mark such as your house or fence or even just a spot on the lawn a good distance away. Mark that point with a screw/nail/stake. This is a 2-person task as one looks through the scope as the other moves the marker. Using only altitude adjustment, swing the scope to the south and place another marker. Pull a string between markers and you have a north-south line passing over the pier. It doesn’t have to be precisely over the center of the pier as it can be offset to establish a line over the center of the pier.
An EQ mount can also be used. Move the RA axis until the counterweight bar is horizontal (use a level) and lock it. Center the scope over the pier location (center the scope, not the tripod). Use the mount’s azimuth adjustment to center Polaris. If you are not fairly close to start with, you may have to move the entire tripod. Follow the steps above to establish the north-south string line.
If you cannot see Polaris:
Set up a folding step ladder over the center of the pier and hang a plumb bob (weighted string) from the top. Google the local time of solar noon and at that time mark the shadow of the string. Mark the shadow of the string where it hits the shadow of the ladder so you get the longest and most accurate line. If you are trying to find the shadow on your lawn, a board or a piece of cardboard can help you see the shadow. Put at stake or marker at the end of the string shadow and then pull a string from that marker, directly under the plumb bob (over the center of the pier) and about 10′ farther south and place a stake or marker and pull the north-south string line.
You now have a north-south string line passing over your pier and attached to stakes or other fixed objects on both ends. Temporarily remove the string for concrete pouring.
If you are drilling an existing foundation for adhesive anchors, follow the same procedures but simply mark a line on the concrete.
There are other methods of establishing the string line but the point is, spend just a little time getting it right at this stage, while it’s easy, and you won’t risk needing to wrestle a pier and mount later.
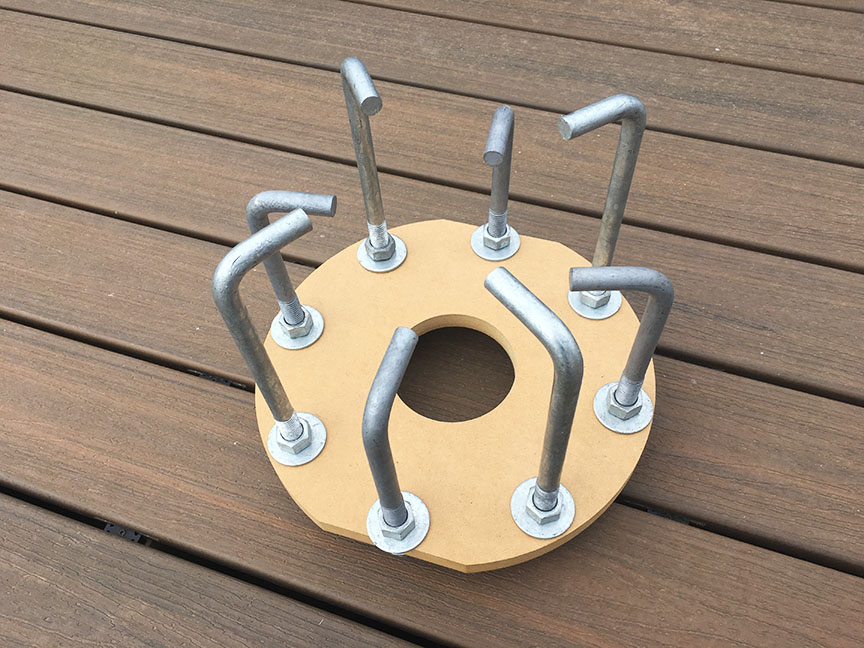
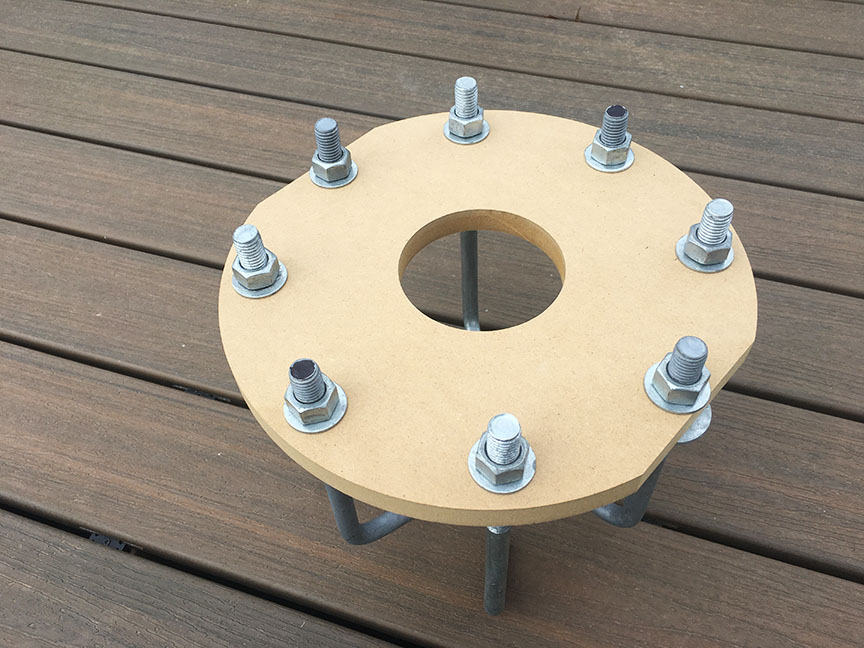
Prepare the template:
There are 2 different lengths of anchor bolts and they alternate around the template. It doesn’t matter where you start. For each anchor bolt, put the bottom nut and large washer on, push the bolt through the template, put the small washer on, run the top nut down so 5/8″ of thread is showing above the top nut. Hold the top nut and tighten the bottom nut tightly against the template. Place the template, with anchor bolts in place, on the concrete form to verify that the reinforcing and conduits do not interfere with the bolts. The legs of the anchor bolts can be rotated in any direction to clear obstructions. Maintain 1-1/2″ concrete cover on the anchor bolts and their legs. Mark the tops of any two opposite bolts. These will be the markers to line up to the string.
The hole in the center of the template is the same diameter as the port in the bottom plate of the pier so all embedded conduits must pass through that template opening.
Setting the template:
We want the concrete very fresh so the bolts can be easily embedded. As soon as the top 12″ of concrete is placed, install the north-south string between stakes and then embed the bolts using the template. It is not critical that the string be directly over the marked bolts. It IS critical that a line through the marked bolts is parallel to the string. Embed the bolts until the bottom of the bottom nuts are 1/4″ above the concrete. Tap the form and template to remove any air pockets around the bolts. Using blocks or shims, level the template in the north-south and east-west directions.
Wait at least 24 hours before removing the top nuts and washers and pulling the template off. Do not move the bottom nuts. They are already level. If they get moved, simply re-level. The template is designed to be a tight and accurate fit and may not slide off without help. If it resists, wiggle and tap and use a small piece of wood as a pry bar.
Setting the Pier:
The pier plates are notched to indicate south. Set the pier over the bolts with the south anchor bolt slot over the south anchor bolt. Install the top washers (smaller diameter) and top nuts and leave a 1/8″ gap between top nuts and top washers until level is checked.
Leveling:
A level top plate is not critical for EQ mounts and wedges but leveling will save some time in later polar alignment. If your template was installed level, your top plate is already level. To check it, use a spirit level to check north-south and east-west. If further leveling is needed, begin with the north south direction and raise the bottom nut on the low side until the top plate is level then tighten the top nuts on the north and south bolts. Repeat in the east-west direction.
For the remaining bolts, tighten the bottom nuts against the bottom plate and then tighten the top nuts.
Proper bolt torque is 45 lb-ft. This is not critical but, unlike typical anchor bolts, we do want to pretension these connections. To estimate proper torque, use a common box end wrench and tighten as tight as you can with both hands. For comparison, lug nuts on your car are 70-85 lb-ft. Check every nut this way.
For setting anchors in existing concrete: